Note: All the pics were made by Bitmap, and are very cheap and to the point.
Here we go... Your Dreamcast has been unplugged for a while, or the battery is gone for some "unknown" reason and your tired of going through the date and time everytime you start the system, well, install your own AA's or AAA's using this guide!
What you need...
1. Dreamcast controller board
2. Soldering iron and rosin core solder
3. Battery pack that holds 2 AA's or AAA's, your choice
4. Possibly some wire or 9volt battery connector depending if you battery pack needs that to connect.
5. NiCad batteries so they can recharge.
First things first...
The Dreamcast is constantly recharging the battery when on, so you'll wanna make sure you use rechargable NiCad batteries. Maybe use normal alkeline for a test run or something to make sure it works first.
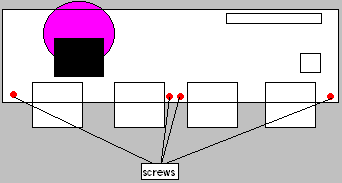
Remove four screws on bottom of DC, and carefully remove top. Remove the four screws holding controller board down. Remove the fan connection VERY carefully, and then the ribbon from the control board. Take out the controll board and examine it...
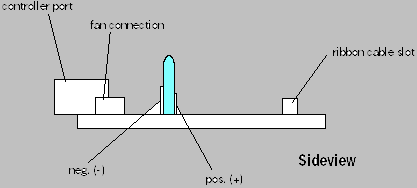
Look at your battery, or where the battery used to be. The side with 2 connections going to the board is the neg. (-) spot, and on the other side of battery where there is only one connection going to the board is the pos. (+) spot.
Were gonna need to remove theold battery. Simply place the soldering iron on each point until it melts, then tug a little to loosen it. Each point may take a couple times over until all come out. Tip: Melt the pos. (+) connection first, and when its able to move, simply bend the battery back from the neg. (-) spot to get the pos. (+) pin out.
Ok... Get your battery pack ready. Strip the tips of each wire unless alreay done for you. Simply solder the pos. (+) of battery pack to the pos. (+) on controll board, and the neg. (-) from battery pack to either neg. (-) on controller board you want.

WAIT! Don't screw the system all back together and all that before testing it. Put your batteries in, and start the system up. Set the correct time and date, and let the system stand for about 5 minutes, keeping it on. Turn the system off, and unplug it for 5 minutes. Now, plug it back in and voila, the time and date should still be there. You'll know because the menu should pop up instead of the time and date form.
"It didn't work!"
1. Check all your solder joints.
2. Put new batteries in, not those ones you found in the drawer in moms room.
3. Reverse the pos. (+) and neg. (-) wires on the controll board just for kicks. That may be the problem.
4. Put the batteries in the pack the right way!
5. E-mail me for problems not answered in this little mini troubleshooter guide right here.