Tutorial Name: Sega Saturn Controller LED
Platform: Sega Saturn
Tutorial Download: N/A
Pic: satcontroller_0.jpg
Tutotial:
Sega Saturn Controller LED
Written: 05-19-03
Finished: 05-19-03
Here's what your making:

Why: I know most people wouldn't want to "mod" a vintage system like a NES, or SNES, so why a Saturn? Well, it was someone on DCEmu which gave me the motive. It wasn't that they did a mod and it looked good enough for me to do, it was the fact he brought it up. I've modded a controller before. The Dreamcast. I installed an orange LED with the same, or very close to the same MCD as the DC's power LED. Anyway, I wanted to do it.
The Tutorial's Model: MK-80116
What you will need:
1. Soldering iron, and rosin core solder
2. Phillips head screwdriver
3. Sega Saturn controller
4. LED- 3mm, or 5mm, any larger and it'll look stupid- 3-4 volts
5. Wire- 6in max. you shouldn't even need that much
6. Drill-with drill bits
7. Super glue- to hold the LED in
And we're off...
Take your screwdriver, and remove all 5 of the screws from the back. Make sure front of controller faces down while removing back so you don't lose any parts.
Remove the board, and flip it over to where the chip is. My controller was brown when you first open the case, then when flipped over, green. Therefore, you want the green side with all the stuff.
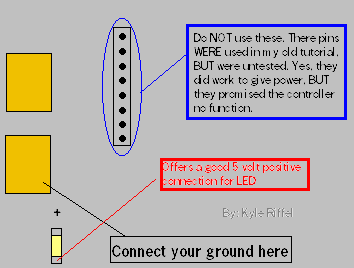
Installing the LED:
See the 2 gold boxes, the bottom one with the plus (+) sign by it? That's your ground. Solder your ground here. Now, see the line of solder joints that attach to the pins, which lead out the controller to the system? The top three are good positives if you just want your LED to run, and the controller to stop responding.
Connect your LED to the only resistor ont he board. Its right under the gold boxes where you placed your ground. BE CAREFUL!
Test it to make sure this baby works.
Mouting the LED:
Take your drill, and make sure to start with a small bit for a pilot hole. Gradually move up in bit size until the LED fits "snuggly" in the hole. Go ahead and superglue the LED inplace.
If the LED is big and tends to poke out of the controller a lot, like mine, simply hold it in the position you want and glue, but you'll want to hold it in place until it gets done drying.
Now, close it up and enjoy! Ohh! Unplug the soldering iron! He! He!
Why didn't it work!? Okay, if it didn't work, use this check list...
1. The LED is rated 3-4v
2. The solder from a connection is not touching the wire, it just looks like it is from the top or side..
3. You have pos. and neg. backwards- LED's are diodes. They only let current in one direction. Therfore, if you cross the connections, the current stops. They are NOT like lamps.
4. Maybe you accidently have two connections touching, like I said to be CAREFUL for!
5. You are VERY confused with this easy to understand tutorial, and just "guessed" where to solder.
6. Your LED is fried. Try another. Do not de-solder from board, just de-solder wire from the LED, and try another.
If it still doesn't work, sorry. I've told you what model I have, and what it's been tested on. If your model is different, try some "research" on your own to figure out how to connect that LED to the controller. How do you think I figured it out?
Good luck!