Tutorial Name: Sega Saturn Built-in AV Cable
Platform: Sega Saturn
Tutorial Download: N/A
Pic: avmod_0.jpg
Tutorial:
Sega Saturn- Built-in AV Cables
Written: Started: 04-22-03
Finished: 05-13-03
By: Kyle Riffel
I apologize. All pics of any circuit board are made through Bitmap because my digital camera sucks. It won't take good pics of any board. They turn out blurry. And solder joints look like donuts for some reason. Sorry.
Work log:
04-22-03: Started mod. Wrote out how to connect video wire. Added to my site that the tutorial will be up soon on my new Tutorials Page!
04-29-03: Delay in my Sega Saturn controller shipment. Couldn't set up the system to play a CD while I looked for audio without a controller.
05-09-03: Sega Saturn controller came in! Too bad I had to leave for that weekend.
05-12-03: Wrote out the audio tutorial part.
05-13-03: Wrote, and did the drilling and wire-to-wire soldering. AV Cable all hooked up and running! Finished!
Here's what your making:

Seems simple huh?
The tutorials model: This is the model of the system I did this mod on. If yours is different, there shouldn't be too much of a problem, but just so you know
Model: MK-80000A
Year manufactured: 1997
Mod chip: No
Circle buttons- not oval
Purpose: To allow a person to have built-in AV cables for their system, without the use of those goofy, S-Video looking cables.
Why: I thought of this mod when I got my Saturn, and realized, "Man, I need one of those goofy looking cables. Screw it, I'll install my own AV cable!" Plus, this gave me something to do.
What you will need: Here we go
1. Soldering iron, and rosin core solder, err
2. Wire- I used small wire for the board soldering
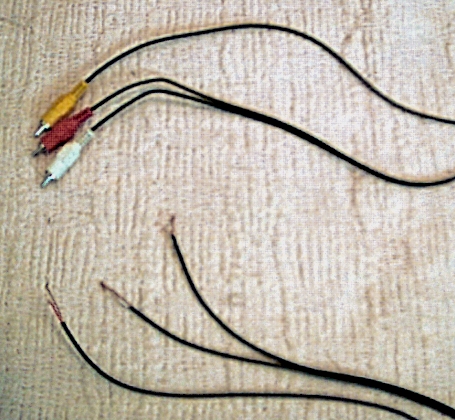
3. PlayStation AV cable that you can cut up for the RCA plugs, or any cable with RCA connections. Mainly, you need an AV cable with RCA male connectors like shown.
4. Phillips head screwdriver(s)
5. Sandwich baggy- to hold all your screws and small pieces, trust me!
6. Drill, with big enough bit to cut a hole for your AV cable to run through
7. Electrical tape to insulate, and strap wire down with.
8. A bit of time- the delicate soldering will be the most time consuming. Some spots are so close
And were off
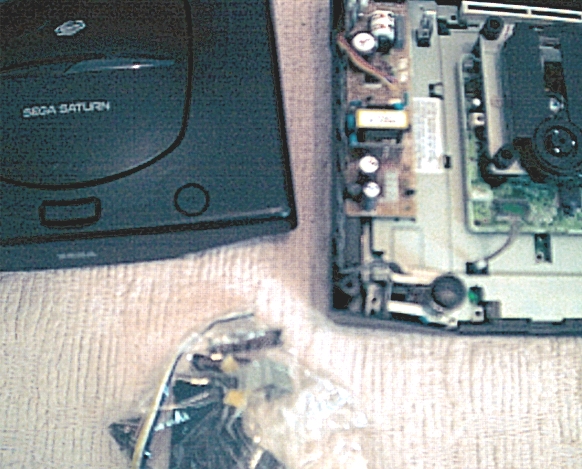
Fist of all, you know the drill, take the system apart until you get to the motherboard. I'm not going through all the steps, because it's not hard. Make sure you find every screw. Some seem to be hiddenlike the one under the laser! Put all your screws and small parts in your sandwich baggy.
Video:
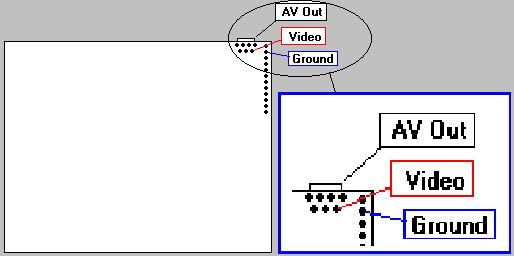
Flip the board over, and examine it until you find the AV Out port. The "goofy, S-Video looking cable," as I like to say. See all the little solder dots behind the AV Out port, yeah, those are what you solder to. Take your soldering iron, and a good length of wire and get ready to solder your video points. Not your AV cable wires, you other thin wire. Here they are
I used the thin wire for each of those little solder joints, like I said to use, then just spliced that thin wire to the correct wires on the AV Cable via solder joints LATER in the mod. Soldering those thick wires to the little solder joints would be impossible anyway. DO NOT splice the thin wire to the AV cable wire yet! Unless you don't mind undoing it. Why? Because we haven't drilled a hole in the back for the AV cable to pass through yet!
I'm pretty sure I didn't draw the "exact" same amount of joints under the AV Out, but just realize, the joint you want to solder your video wire to is the bottom right hand one, and use those solder joints along the edge of the board for a ground. They work fine, and are safe. You might want to power up the system, and just touch your video wires to the joints and look for video on your screen, just to make sure you know which joint it is, and are not confused with the tutorial.
Audio:
Ahh, the audio. The second most important thing to fun on the Saturn, You can adjust surround sound, play with pitch, and remove vocals. But you can't hear it without your audio hooked up. This may be a hard thing to do. The 2 solder points are close. I'm sure I have the correct amount of solder joints on this picture. If not, just realize that the right audio joint is the 3rd from the left, and the left audio is the 3rd from the right. Both are in the middle of the top row of solder joints.
Use the same ground from the side of the board from the video joint. But, try not to use the actual joint you soldered the video cord to.

AV Cable hole:
Now it's time to drill our hole for the AV cable. Depending on how thick your AV cables are also depends on what drill size you use. Me, I just drill a small hole, then see if all three of the AV cable wires can fit at the same time. If not, I make a slightly bigger hole. I'm using old PlayStation AV cable, so the hole is pretty big.
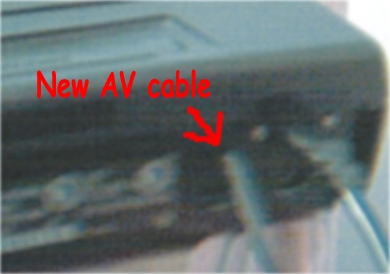
Once you have a hole where the cable fits, get a good size length of it ready for soldering the audio/video wires from earlier to. But first, tie the AV cable into a knot inside the system, so it can't be yanked out later, TRUST ME!
Ok, now your ready to solder each wire from board to your AV cable. Remember which wires are negative and positive? I hope you do! Wire up each one to their correct spot then test them to make sure. Ok, you got that? Good. Now go ahead and solder them on. Use the electrical (black) tape and wrap each joint with no wire poking out. This is to make sure no wires will touch together, or conduct from a power joint on the board, or interfere with the laser somehow.
Tuck the wires in a good place so they won't interfere with the door open/closed button and/or the cartridge door. You should be good. Put everything back together, and close the system up. Test again just to double check, and have fun!
All Done! Good luck on your mod!